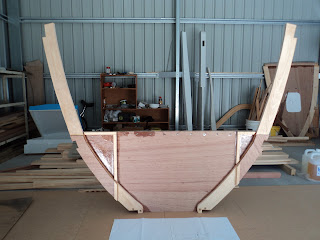
To make a frame first it is necessary to cut the solid wood for the sides to scarf it together. To do this I drew out the shape on cardboard using a 100mm grid and measurements from the plan, then cut out the curve. This was then used to draw the shape on the solid wood which was cut out. You end up with a top and bottom piece both oversize for each side.
On the floor you mark the centreline and the waterline across. From the plans you measure three points, outside top, outside chine and outside bottom (up/down from waterline and out from centreline). The template you cut from cardboard and marked on the solid wood shows you these three points as well, check the plan to make sure, then lay the two cut pieces of solid wood on the floor so they are touching the points (one will overlap the other). Mark the scarf on one (I used the bottom one, it was shorter), cut then lay back down and mark the scarf on the other piece.
Cut and epoxy together and there you have your side piece. Mark the cut outs for the chine.
The bit at the bottom of the photo is laminating solid wood on the rear of a 9mm ply partial bulkhead and 20mm x 20mm solid pieces which will have plywood to make storage areas.
Check it all on the floor, cut out the solid wood for the keel bolts and stick it together
First photo is the rear face, 20mm x 20mm pieces are for a later fit out of plywood to divide storage spaces. Note the 9mm doublers over the scarf in the solid wood each side.
Below is the forward face.


No comments:
Post a Comment